
STEP 2: Understand the buttons
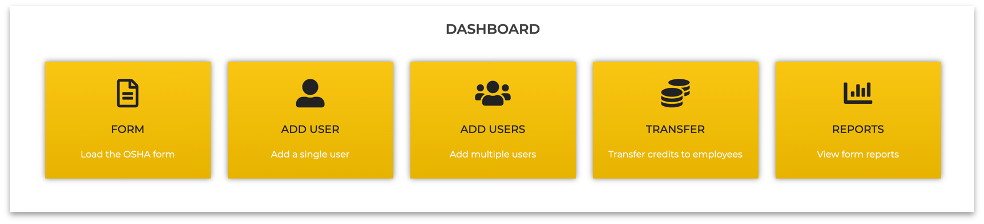
Once you’re logged in, you’ll see a main dashboard (pictured above).
Here’s what each button represents:
Form – This is the OSHA respirator clearance form that your employees will complete. You can go through the process to see how it functions and to test it.
Add User – Here, you can add a single employee at a time. This was designed for companies with a small amount of team members, or if you don’t have a file handy with all of your employee information.
Add Users – Here, you’re able to upload multiple employees at one time via a .CSV file. For this, you will need to use a specific file format, which you can DOWNLOAD HERE.
Transfer – In order for your team members to use the portal, they will need credits, which you’ll purchase either through PayPal or directly from your Worksite Medical customer support representative. Once you purchase those credits, this is the button you’ll press to transfer them to each team member. One (1) credit = One (1) questionnaire. You may also transfer multiple credits to one person, if necessary.
*Only you, as the administrator, may buy credits.
Reports – This is where you’ll be able to view your team’s pass/fail records. You’ll also be able to download their clearance certificates directly, if for some reason they can’t do so.
Note: In order to read the certificates, you will need Adobe Reader, which you can DOWNLOAD FOR FREE HERE.
STEP 3: Add one (1) user at a time
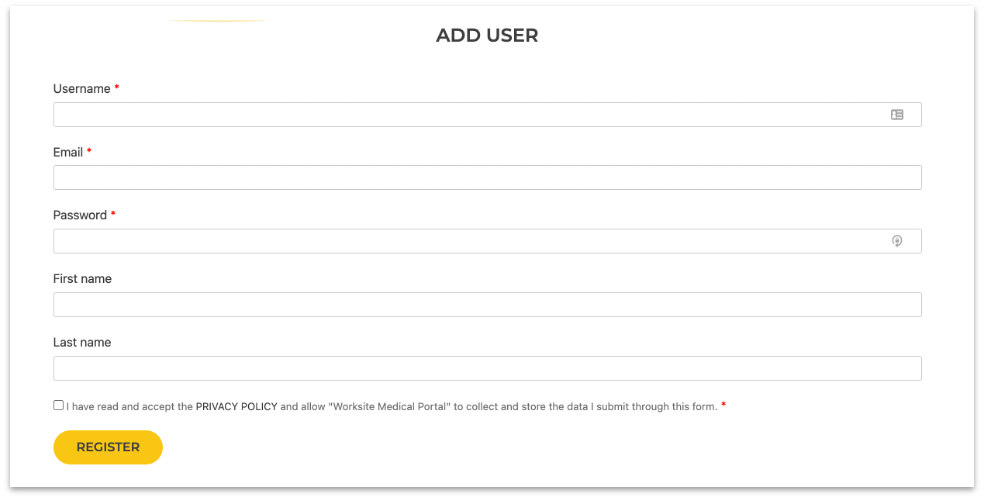
- To add a user, you’ll start by creating a username for that user. For example, if your team member’s name is Tony Smith, then you can create an easy-to-remember username such as TSmith.
- Next, you’ll add that team member’s email address.
NOTE: Be sure to have your employee check their junk folder if they do not receive an email confirmation within 15 minutes. While it’s normally doesn’t, we can’t always guarantee that spam folders won’t flag automated emails.
- Next, you’ll need to create a secure password for that employee. That password must include the following: at least 8 characters, at least one uppercase letter, at least one number, and at least one special character (ex: !@#$%).
Here’s an example of a secure password: tEtris21$
Finally, you’ll add the user’s first and last name. The way you enter the name here is how it will show up on the final clearance certificate, so be mindful of spelling errors and typos.
STEP 4: Add multiple users at a time
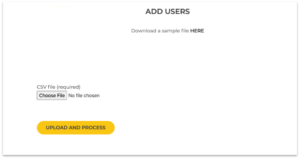
- To add multiple users at one time, you’ll first download the sample .CSV file (YOU CAN ALSO DOWNLOAD THAT FILE HERE)
- Next, you’ll need to add your team member information to the file -. In order to maintain the correct format, the easiest way to do this is to copy and paste from your original file to the template. Go ahead and delete the second row, which starts with “sampleusername” and ends with “test123”
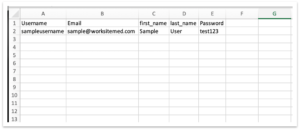
- To do this properly, do not delete the first row as the headers are necessary.
- Additionally, you must create a username and password for each employee. The passwords are temporary, so you can make them all simple. Each employee will be prompted to change their password once they login to the portal.
- Finally, save your document, head back over to the “add users” screen, and click on “Choose File.” There you will select the file you just saved, then click on “upload and process.”Once uploaded, you will be redirected to a screen that shows the uploaded user information, and whether or not there were errors with your upload. Those uploaded users will automatically receive emails from Worksite Medical to change their passwords and to complete their forms. Again, have those users check their junk folders if they do not receive that email.
*If a user does not have an email address, you can make one up for them. That user does not need an email address to access the portal – just the username and password.